
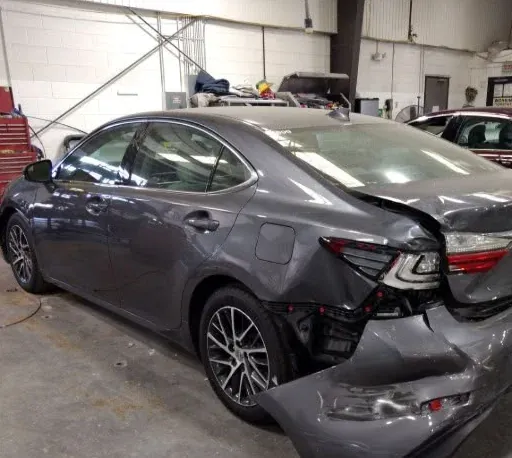
Rear corner hits reach further than they look
From ten feet away this looked like bumper cover damage. With the cover off it was a rear body repair: the quarter panel creased along its length, the lamp pocket distorted, and the trunk opening no longer the shape the lid was built to close against. Rear structure is designed to crush progressively, and once it has crushed, the panels bolted and welded to it stop lining up with each other.
The trunk floor is where the truth lives on a rear-end repair. Under the carpet and the spare-tire well, the rails that run the length of the car end in a section engineered to fold, and any buckling there tells you exactly how much energy came through the bumper. That area was opened up and measured before the repair plan was written.
Straightening the rear and resetting the openings
Quarter panels are welded structure rather than bolt-on parts, so the first decision was whether this one could be pulled and worked back into shape or needed sectioning at a factory seam. That call is made with the measuring system attached and the panel exposed, not by eye — and once made, the metal is worked slowly so it returns rather than springs. Panels pulled in a hurry look right on day one and telegraph their creases within a year.
With the structure right, the openings come next. A trunk lid has to close onto a seal that is under even pressure the whole way around, or the car will collect water and wind noise no matter how good the paint is. The lid, the lamp, and the cover were fitted and adjusted together, and the seal checked, before any of it went to the booth.
- Trunk trim and spare-tire well opened up to inspect the rear rails
- Rear structure laser-measured against factory specification, before and after
- Quarter panel worked back to shape under measurement rather than by eye
- Taillamp, trunk lid, and bumper cover fitted and adjusted before refinishing
- Trunk seal checked for even compression all the way around the opening
- Rear parking sensors and blind-spot hardware checked on reassembly
Judging a rear-end repair
Open the trunk and look at the shut faces before you look at the paint. The lid should meet the seal evenly on both sides, the gap along the rear edge should stay constant, and the lamp should sit tight against the quarter panel with no step where the two meet. Inside, the trunk carpet should lie flat over a floor with no new ripples anywhere in it.
Then check the electronics that live in a rear bumper. Park sensors and blind-spot radar mount in the exact area that gets replaced, and a sensor refitted at a slightly wrong angle produces warnings that never quite make sense. Those were verified on reassembly here, and the refinish work on the quarter panel, lid, and cover carries a lifetime warranty. One more check is worth doing yourself: drive the car on a rough road with the radio off. Rear structure straightened without being measured tends to announce itself as a creak from the trunk area, and it is much easier to sort out before you take the car home.